Creating a Company Profile
This option captures details about the organizations who reserves rooms at the property. The user enters the company’s name and other mandatory details (marked with a red asterisk). The user can update the profile any time.
Perform the following steps to create a company profile:
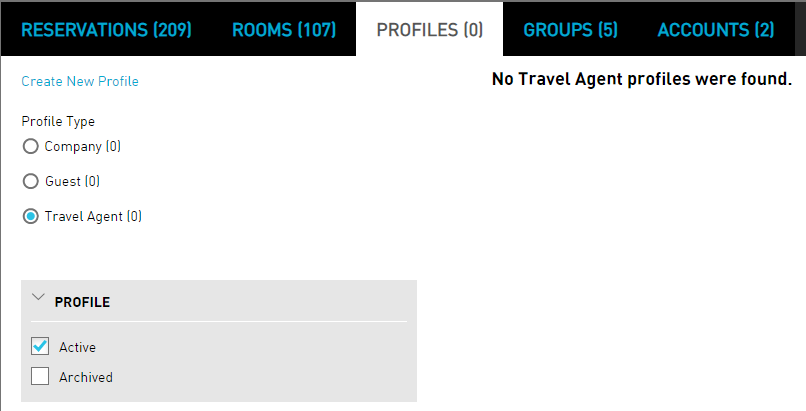
Navigate to Reservations ➜ Profiles. The Profiles tab is displayed.
Click Create New Profile. The Create New Profile dialog box appears.
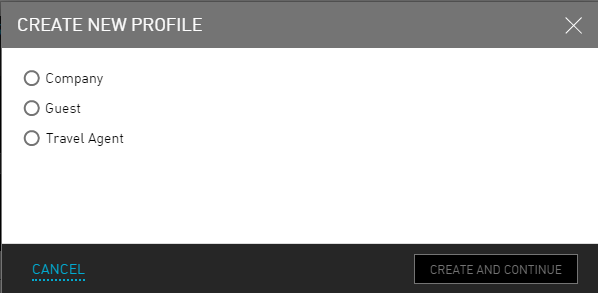
Select the Company radio button.
Click Create and Continue.
Refer to the following table and fill in the fields to create a company profile:
|
Field |
Description |
|---|---|
|
Summary |
|
|
Company Name |
The name of the company. |
|
Code |
The unique code to identify the company. |
|
Pronounced |
The pronunciation of the company name. |
|
Website |
The official website of the company. |
|
Rate Plan |
The rate plan assigned for the company. |
|
Marketing |
|
|
Guest Type |
The type of guest for the company. |
|
Source Of Business |
The source of business for the company. |
|
Market Segment |
The market segment associated with the guest type. |
|
Address |
|
|
Address Type |
The type of address of the company. |
|
Street |
The street address of the company. |
|
City |
The city where the company is located. |
|
State/Province |
The states or province where the company is located. |
|
Zip/Postal Code |
The zip postal code of the company location. |
|
Country |
The country where the company is located. |
|
County |
The county where the company is located. |
|
Keep Private |
Indicates that the address details provided are private. |
|
Phone Numbers |
|
|
Phone Type |
The type of company phone number. |
|
Number |
The phone number of the company. |
|
Extension |
The number of phone extensions in the specified area. |
|
Keep Private |
Indicates that the phone number details provided are private. |
|
Email Addresses |
|
|
Email Type |
The type of email for the company. |
|
Address |
The email address of the company. |
|
Keep Private |
Indicates that the email address details provided are private. |
|
Contacts |
|
|
Add |
Click to add a contact detail of the travel agent. |
|
Reservation History |
Displays the reservation details of the profile. |
|
Groups |
|
|
Currents |
Displays the current group details. Click Add to add current group details. |
|
Future |
Displays the future group details. Click Add to add future group details. |
|
Past |
Displays the past group details. Click Add to add past group details. |
Click Save & Exit. The company profile is created successfully.
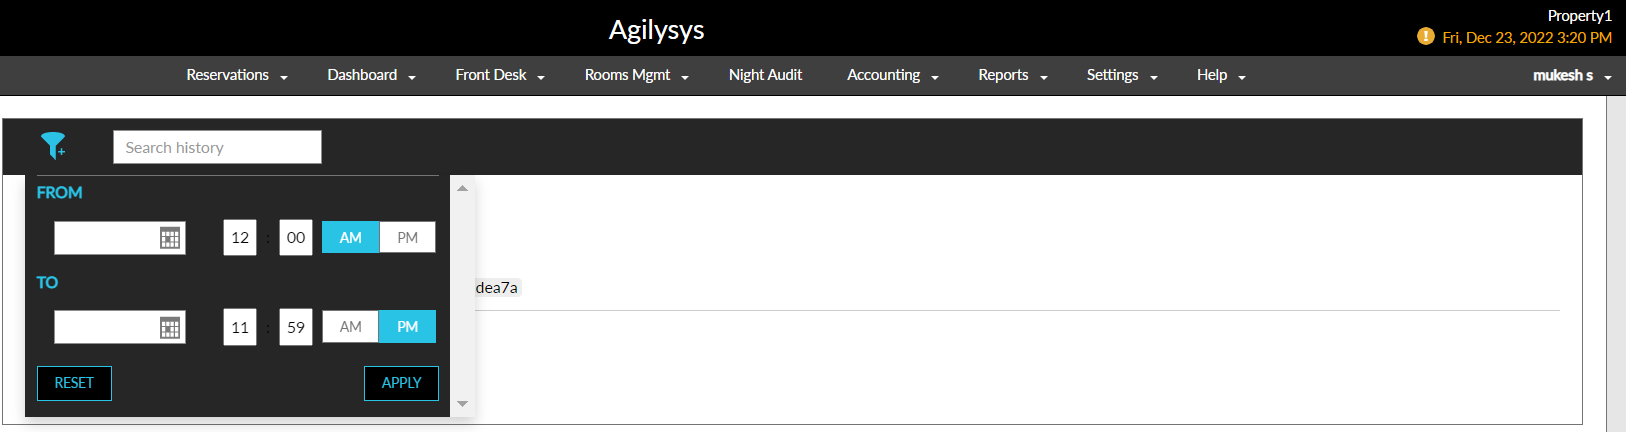
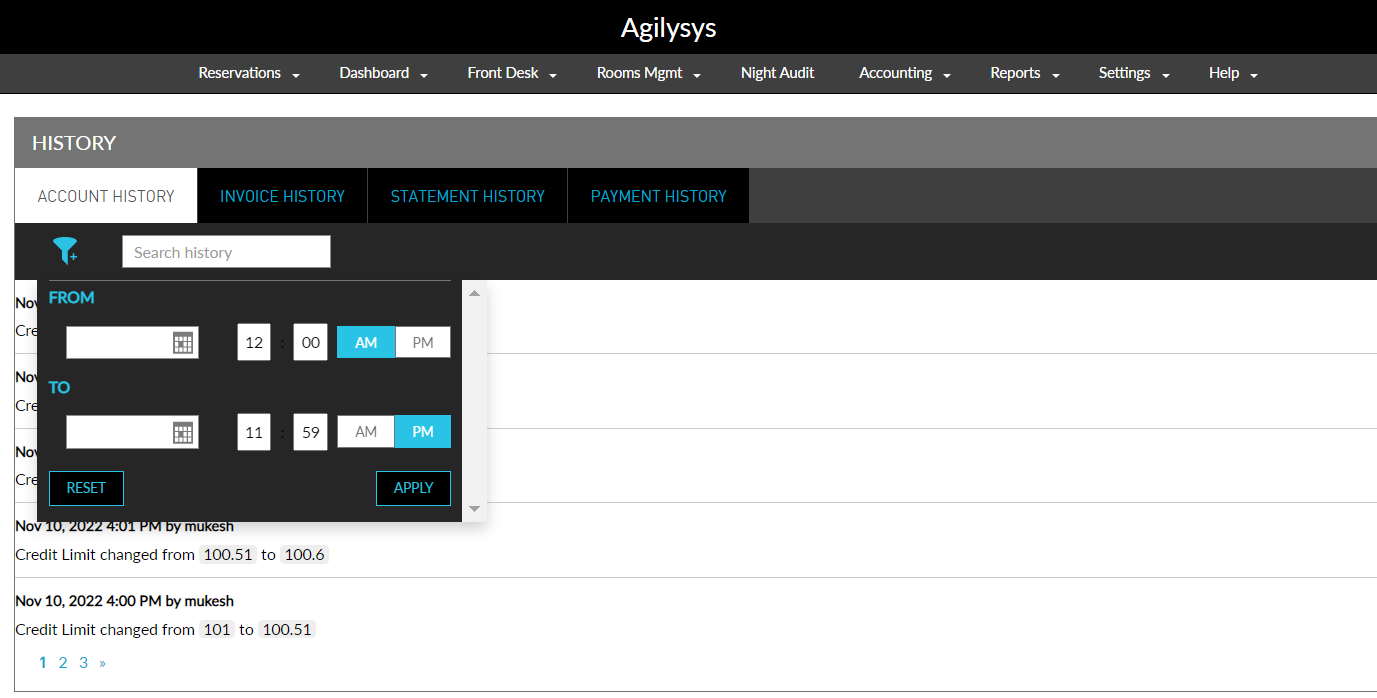
Users can view and print logs of all the changes made to the profile in the History section. Users can search for a record or filter records for the selected date and time.
Creating an A/R Account
Create Accounts Receivable (A/R) account for organizations with repeated reservations at the property or businesses that host events at the property. Use these accounts to create invoices, set payment terms, create statements, and set credit limits.
Navigate to Reservations ➜ Profiles. The Search page opens with the Profiles tab selected.
Type the full or partial name of the company that users want to find in the Search box
Click Go. The profiles that match the search query appear on the Profiles tab.
Select the company for which users want to create an accounts receivable (A/R) account, and then click the Accounts Receivable tab.
When prompted to create a new account, click Yes.
Select an Account Contact for the company and its reservations—the account contact information auto-populates from the company profile.
Contacts that are saved to the company profile appear in the Account Contacts list.
Select the Preferred communication method for receipt of account invoices and statements, either Email or Print.
Select the Create custom account number check box if the property has an account number convention that they follow. If users select this check box, type the custom number in the Account # field that appears. If users don't select this check box, the account number will be generated for users by Stay when users save.
Type a Credit Limit to set the maximum amount of charges posted to the A/R account.
Select the standard Terms for this account: 30, 60, 90, or 120 days. Terms begin on the property date when the invoice is created.
Assign a default routing rule to the account if a routing rule is already available.
Enable Show Third Party Source On Invoice to display the third party confirmation number information in invoices. Once enabled, select the required third-party’s from the dropdown.
Enable Require Reference Number for collecting reference numbers like the CLC Lodging CheckINN Card number during direct bill payments.
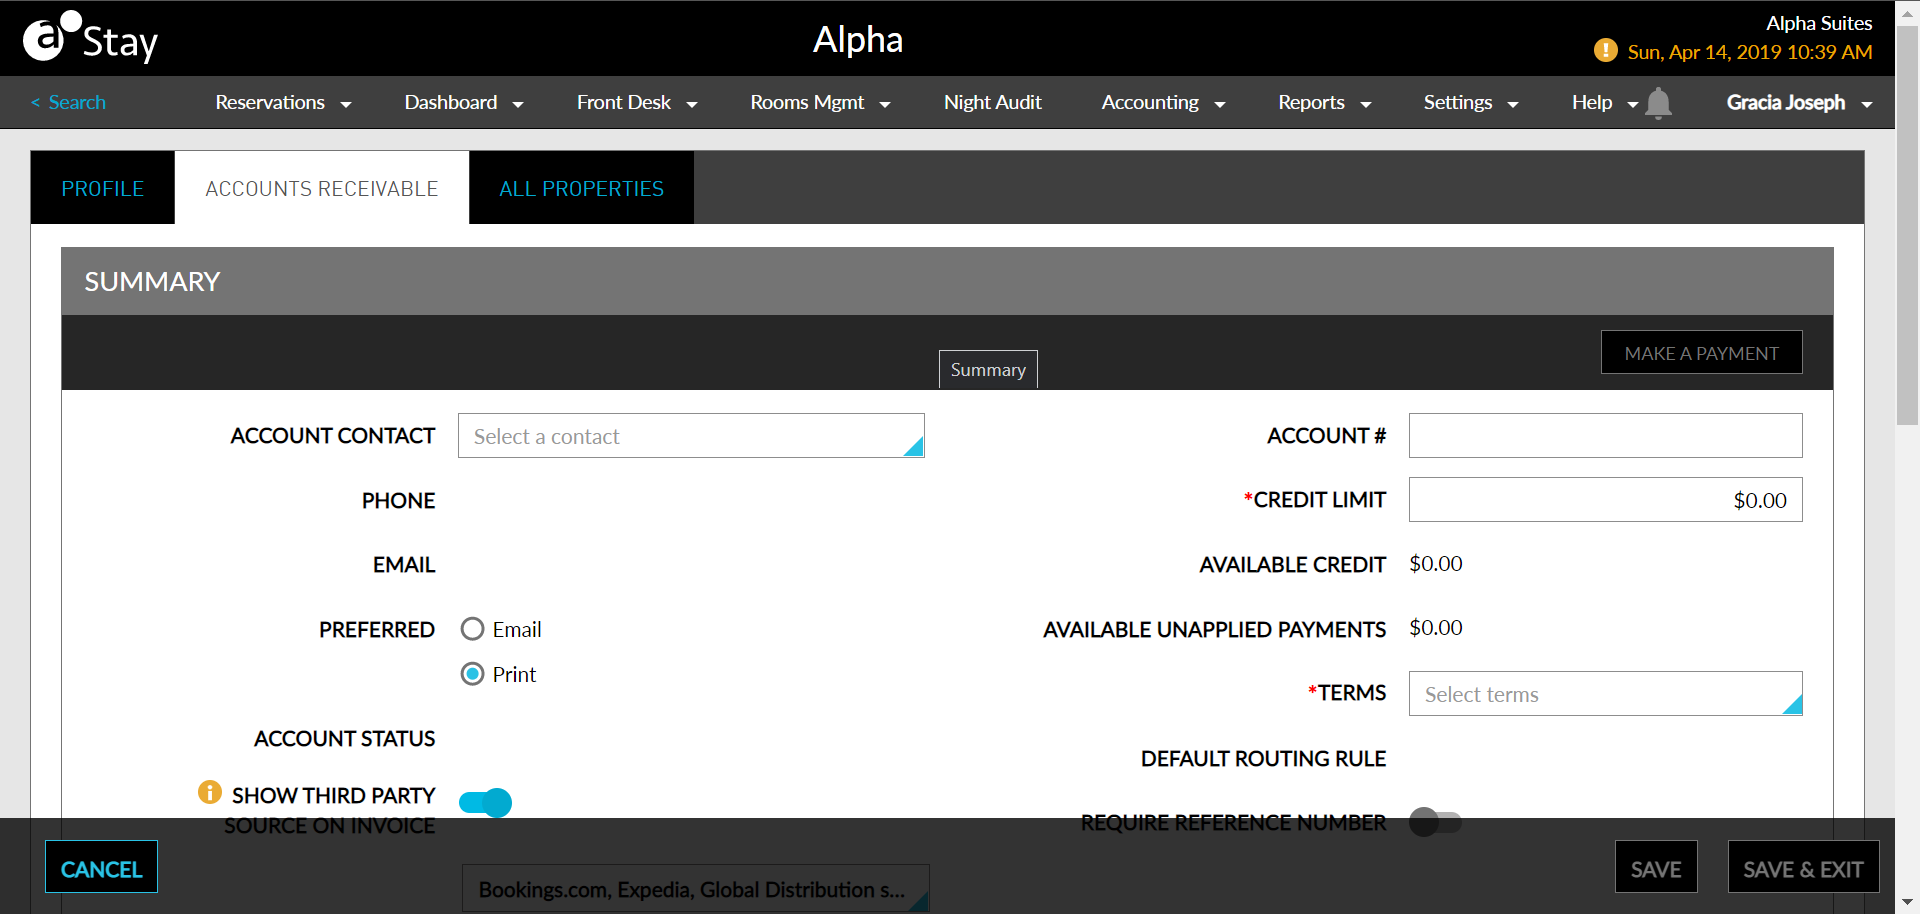
Click Save. A list of tabs appears on the right side of the Accounts Receivable page, and the Tax Exempt and Account Status fields become editable.
-
Settings - allows users to make any other account settings as needed.
-
Non-Invoiced - allows users to add non-invoiced charges or credits to the account.
-
Unapplied Payments - allows users to take payments in AR accounts (non-invoiced) and apply them to one or more invoices.
-
Invoices - allows users to create invoices for the account with one or more non-invoiced charges.
-
History - allows users to view a log of the account activities.
-
Comments - allows users to view a log of invoice comments. For example, comments about receiving deposits, disputed charges or granting write-offs. Comments typed on the A/R Settings page don’t appear on the invoice.
If the organization can incur charges without taxes, select the Tax Exempt link, type the Tax ID, and select tax exemptions.
Select an account Status. The account cannot be closed if there are open invoices or non-invoiced charges. Add a Comment about any status change for tracking purposes.
Users can view and print logs of all the changes made to the profile in the Account History section. Users can search for a record or filter records for the selected date and time.
Configure the Fields Required for Creating Company Profile and Adding a Primary Contact for the Account Receivable
Stay allows users to select the fields that are required to create a company profile and add a primary contact for the A/R account. This feature is not applicable to the other profiles, such as, guest profile, and travel agent profile.
Users can select the required fields in the Field Settings screen (Settings ➜ All Settings ➜ General ➜ Field Settings). This screen displays the following tabs:
-
Company profile
-
Account Receivable
Configure the Fields Required for Company Profiles
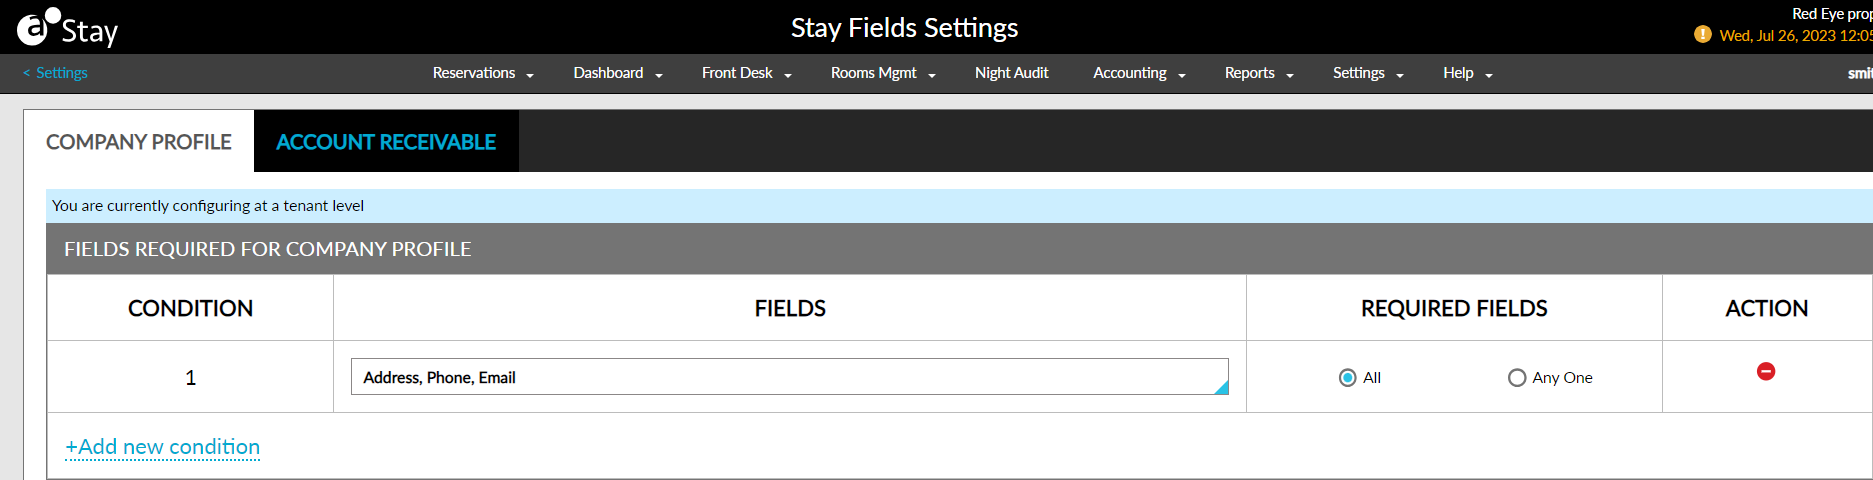
Users can select the required fields for creating company profiles from the Company Profile tab on the Field Settings screen. The Fields Required for Company Profile section displays the following columns:
|
Field |
Description |
|---|---|
|
Condition |
Displays the condition number of the created conditions. |
|
Fields |
This is a multi-select drop-down list that allows users to select the required fields from the following:
|
|
Required Fields |
Displays the following options:
|
|
Action |
Users can delete the condition using the delete icon. |
Users can create multiple conditions by clicking the Add a New Condition option. This option is disabled once all the fields are selected for the conditions. The fields selected for a condition are not displayed for selection when creating other conditions. The conditions created are applicable at the customer level.
The required fields for which the option All is selected are indicated by a red asterisk on the company profile creation page. The fields for which the option Any One is selected are displayed at the top of the profile creation page in the following format: <field 1>, <field 2>, or <field 3> is required for the company profile.
When creating the company profile, the system validates the conditions created for the fields. If the values are entered for the required fields based on the conditions, the company profile is created successfully. If values are not entered for the required fields, the following message is displayed: Required fields are missing.
Configure the Fields Required for Adding a Primary Contact for the A/R Account
Users can select the fields required for adding a primary contact for the A/R account from the Account Receivable tab on the Field Settings screen.
The Select Fields drop-down list on the Fields Required for Account Receivable section of the Account Receivable tab displays the following options:
-
Address
-
Phone
-
Email
-
Credit Limit
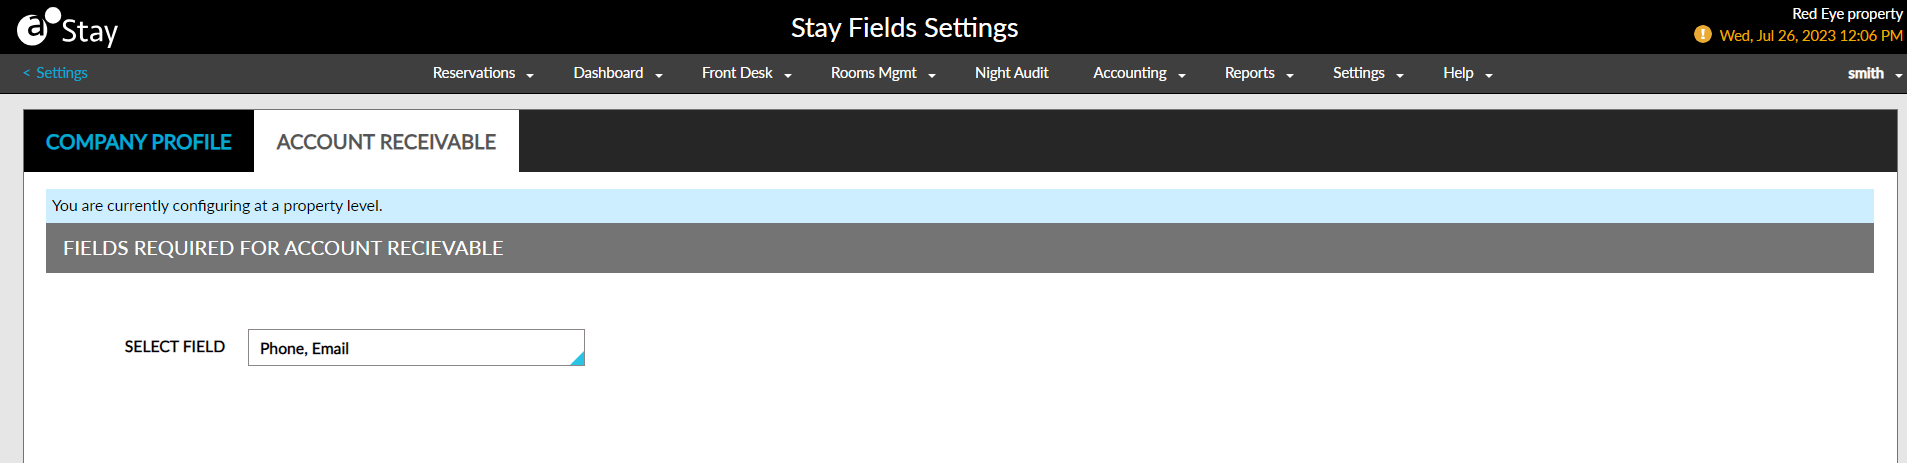
The configurations saved are applicable at the property level. When creating the A/R account, users can enter the details of the primary contact in the Primary Contact section of the Account Receivable tab of the A/R account.
Users can select the contact from the parent profile. Once the contact is selected, the address, phone number and the email address associated with the selected contact is displayed in the subsequent fields.
Users can also add a new address, phone number or email address that is not associated with the parent profile by clicking the Update Contact option. When clicked, the Contact Details to Primary Contact screen appears that allows users to add a new address, phone number or email address. The fields that are marked as required in the Field Settings screen are indicated by a red asterisk on the Contact Details to Primary Contact screen.
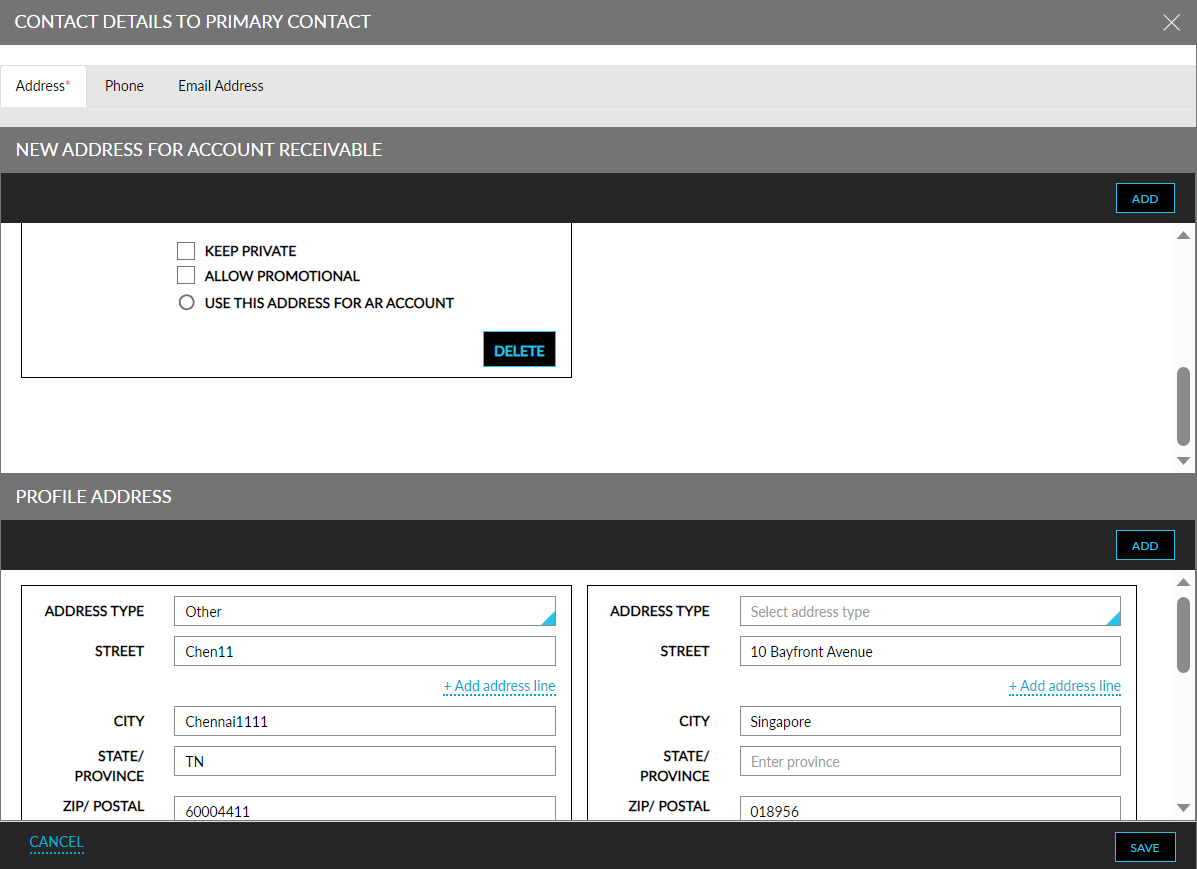
When saving a new address/phone number/email address, users must confirm if the information should be saved only in the A/R account or in the parent profile. The information saved to the A/R account cannot be reused in any other properties, whereas the information saved to the parent profile can be reused in other properties.
When users try to add a primary contact to an A/R account that does not have values for all the required fields, the following message is displayed: Required fields are missing in the profile. Users must then add values for the missing fields using the Update Contact option and then save the primary contact to the account.
Display Contact Details in A/R Account Default Settings Section
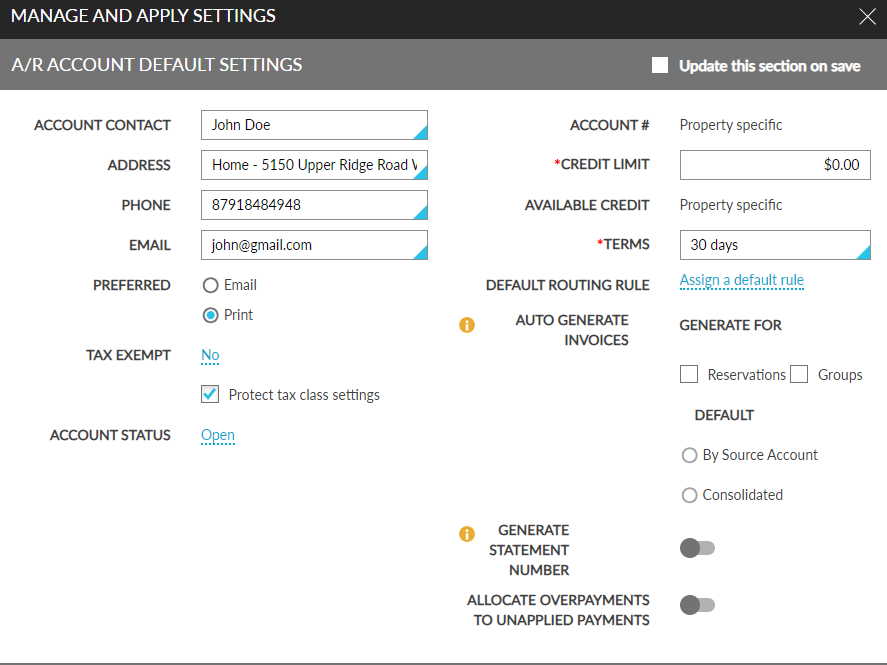
The details of the primary contact selected in the Account Receivable tab is displayed in the Manage and Apply Settings screen on the All Properties tab of the A/R account. Users can also change the primary contact associated with the A/R account from the Account Contact drop-down list. Based on the contact selected, the address, phone number and email address of the profile are displayed in the subsequent fields.
Users can also select a different address/phone number/email address for the contact from the address/phone number/email address drop-down lists. The details that are saved only to the A/R account are not displayed in the drop-down lists. Only the details that are saved to the profile are displayed.
Display Contact Details for A/R Account in Reports
The details of the primary contact associated with the A/R account are displayed in the AR Account Lists Report (Legacy).
-
Two tabs, Company Profile, and Account Receivable in the Stay Field Settings screen (Settings ➜ All Settings ➜ General ➜ Field Settings) allows users to configure the mandatory fields required for creating company profiles and A/R accounts.
-
The Update Contact button in the Accounts Receivable tab of the company profile allows users to update the contact details for the A/R accounts.
Select Account Owner for Company Profiles
Stay allows users to select a guest as an account owner when adding contacts to company profiles.
This enhancement is applicable to company profiles only.
Permissions
The following existing permissions must be assigned to enable users to select an account owner for company profiles:
-
WriteCompanyProfiles
-
WriteProfiles
-
CreateCompanyProfiles
To support this enhancement, the following changes have been made:
-
The Search for a guest hyperlink in the Add a Contact pop-up screen (Company Profile ➜ Profile tab ➜ Contacts ➜ Add) that appears when users add a contact to a company profile is renamed as Search for a Profile.
-
When users select an existing guest profile or create a new profile when adding a contact to a company profile, a new flag, Account Owner, is displayed in the Profile Contact Information section of the Add pop-up screen. This flag is disabled by default. Users can enable this flag to mark the selected guest profile as the account owner of the company profile.
-
A new column, Account Owner, has been added to the Contacts section of the profile. This column displays a radio button that appears selected when the guest profile is marked as the account owner. When more than one contact is added to a company profile, users can select the radio button of the preferred contact to be marked as the account owner.
-
A record is created in the Company History section of the profile when a contact is marked or removed as the account owner.
A company profile can have a different account owner and primary contact.
Categorize Reservations Based on Stay Dates
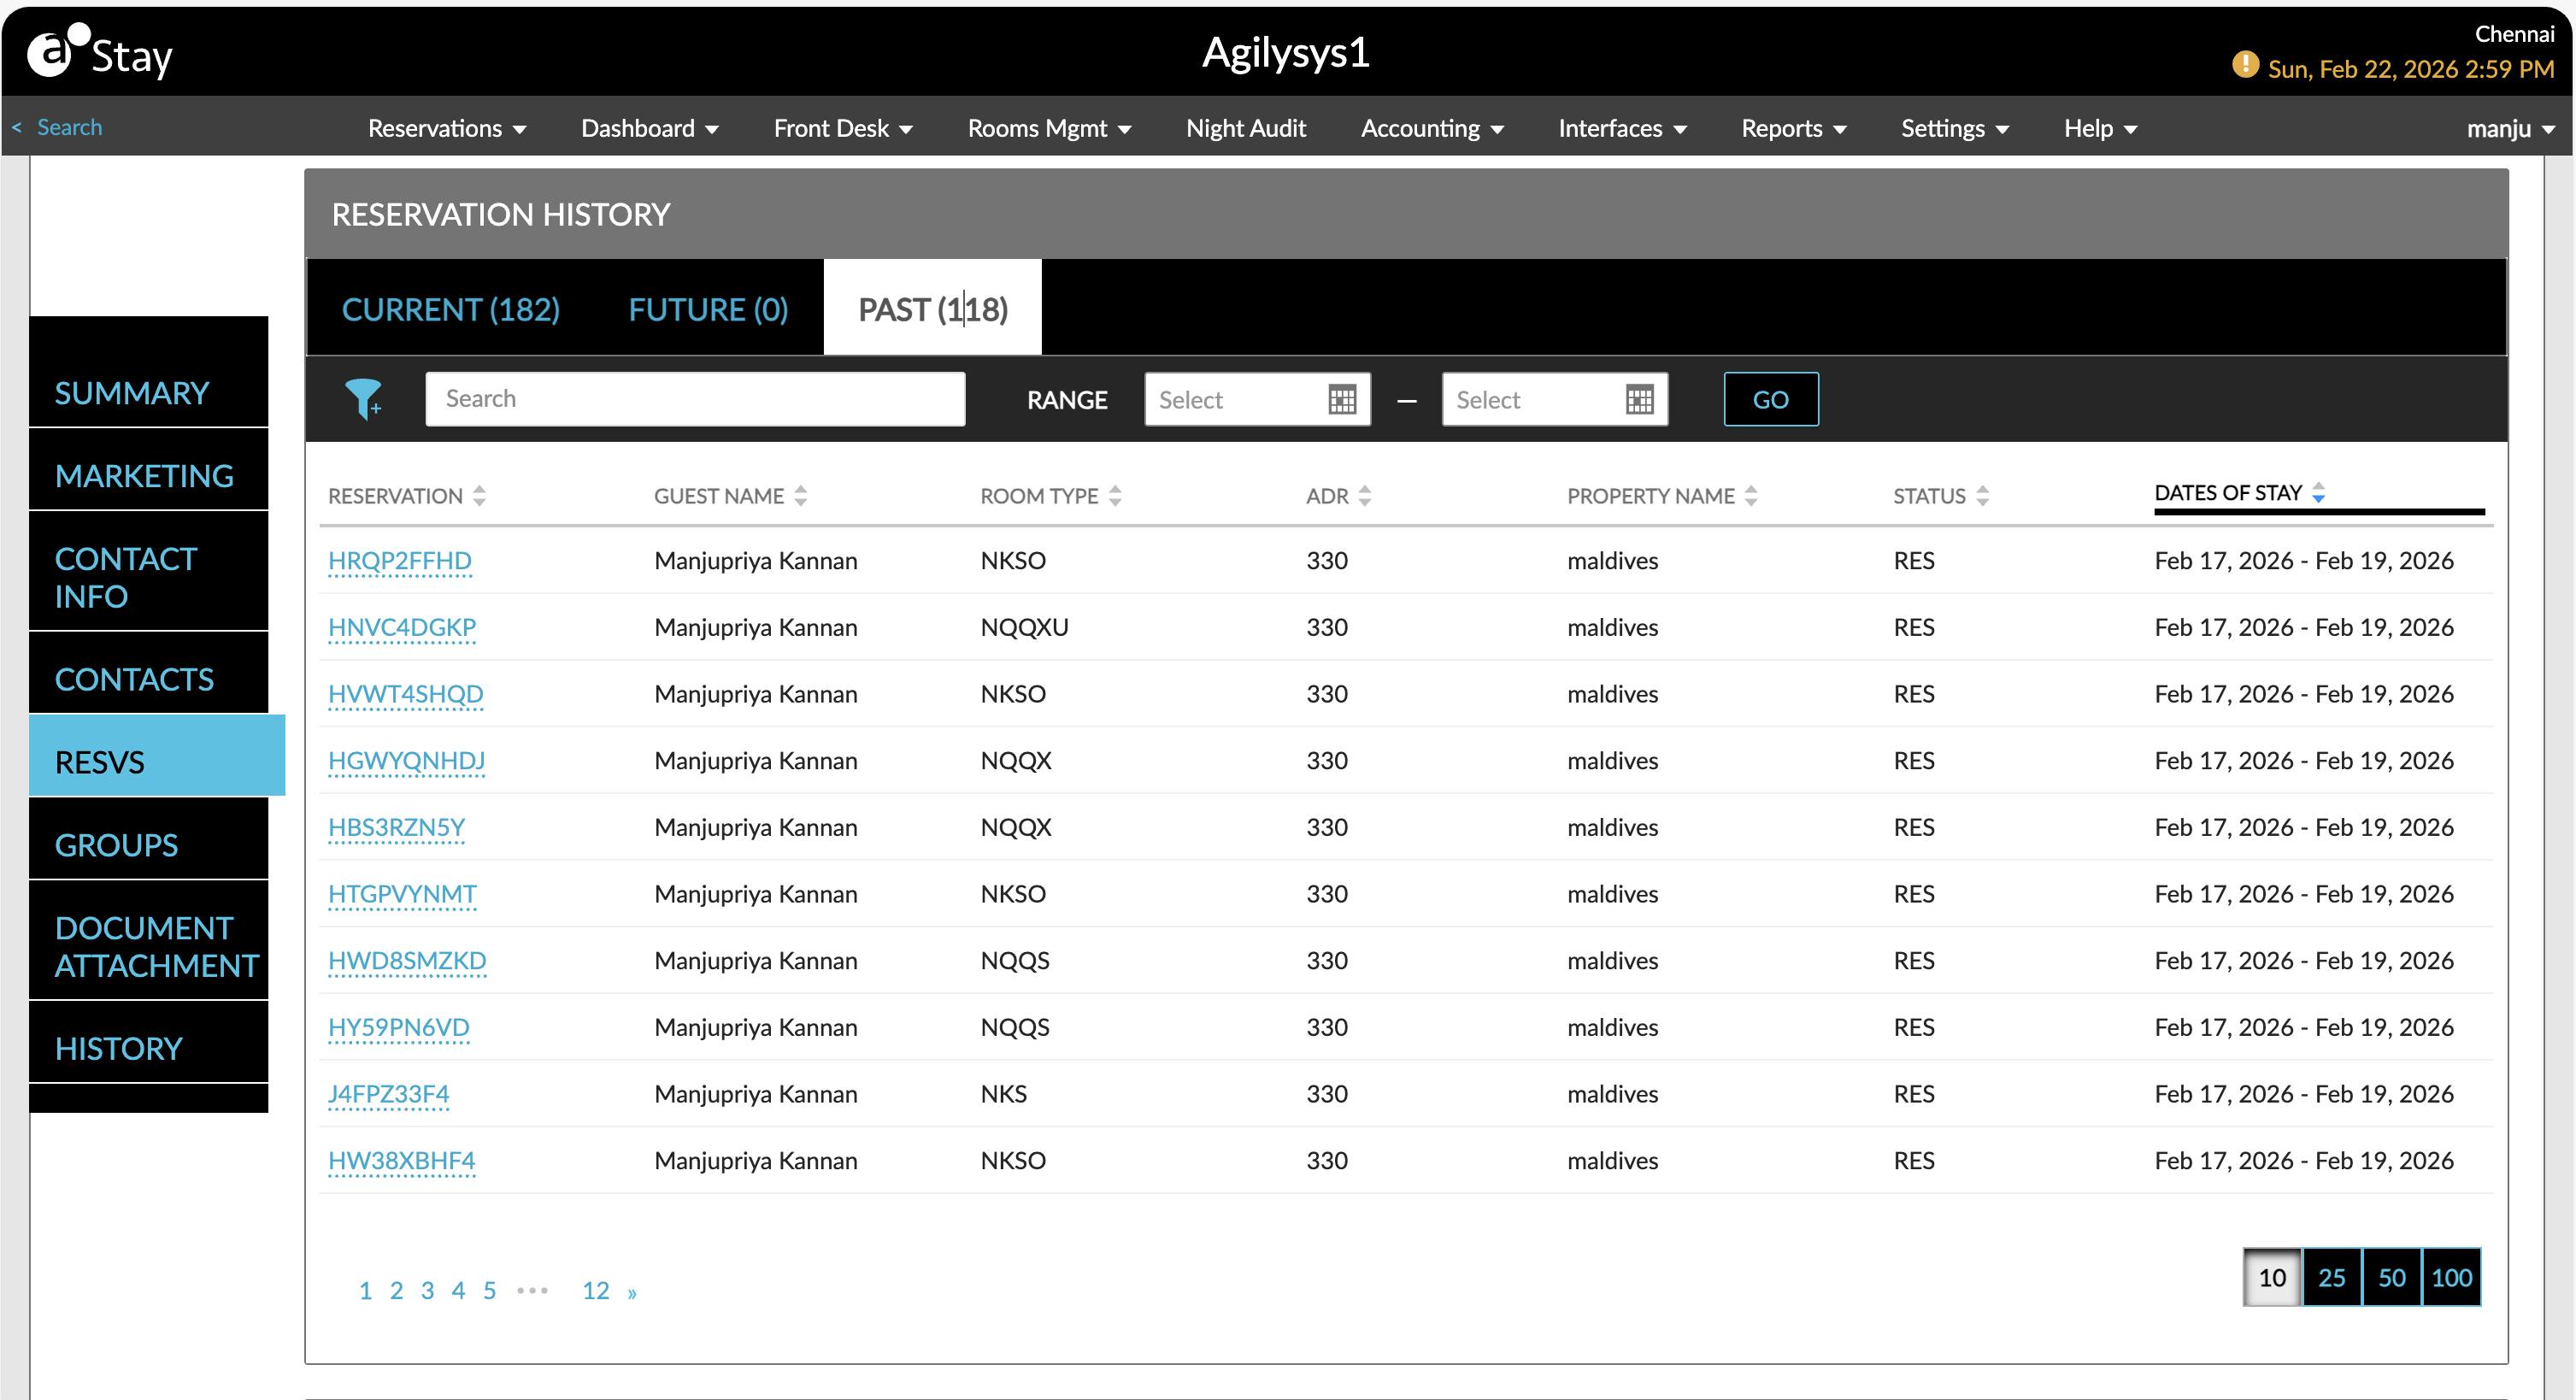
The reservations associated with a company profile are categorized based on stay dates (current, future, and past) in the Reservation History section of company profiles. The following sub-sections are displayed in the Reservation History section:
-
Current
-
Future
-
Past
Each section displays the total number of reservations within that category.
Current Section
This section displays the total number of current reservations at the property associated with the company profile. This includes reservations where the current property date falls within the stay dates.
A property-level filter available in this section allows users to select from the multiple properties available. The reservations are retrieved for the selected properties.
A search field has been added that allows users to search reservations using:
-
Confirmation ID
-
Guest profile name
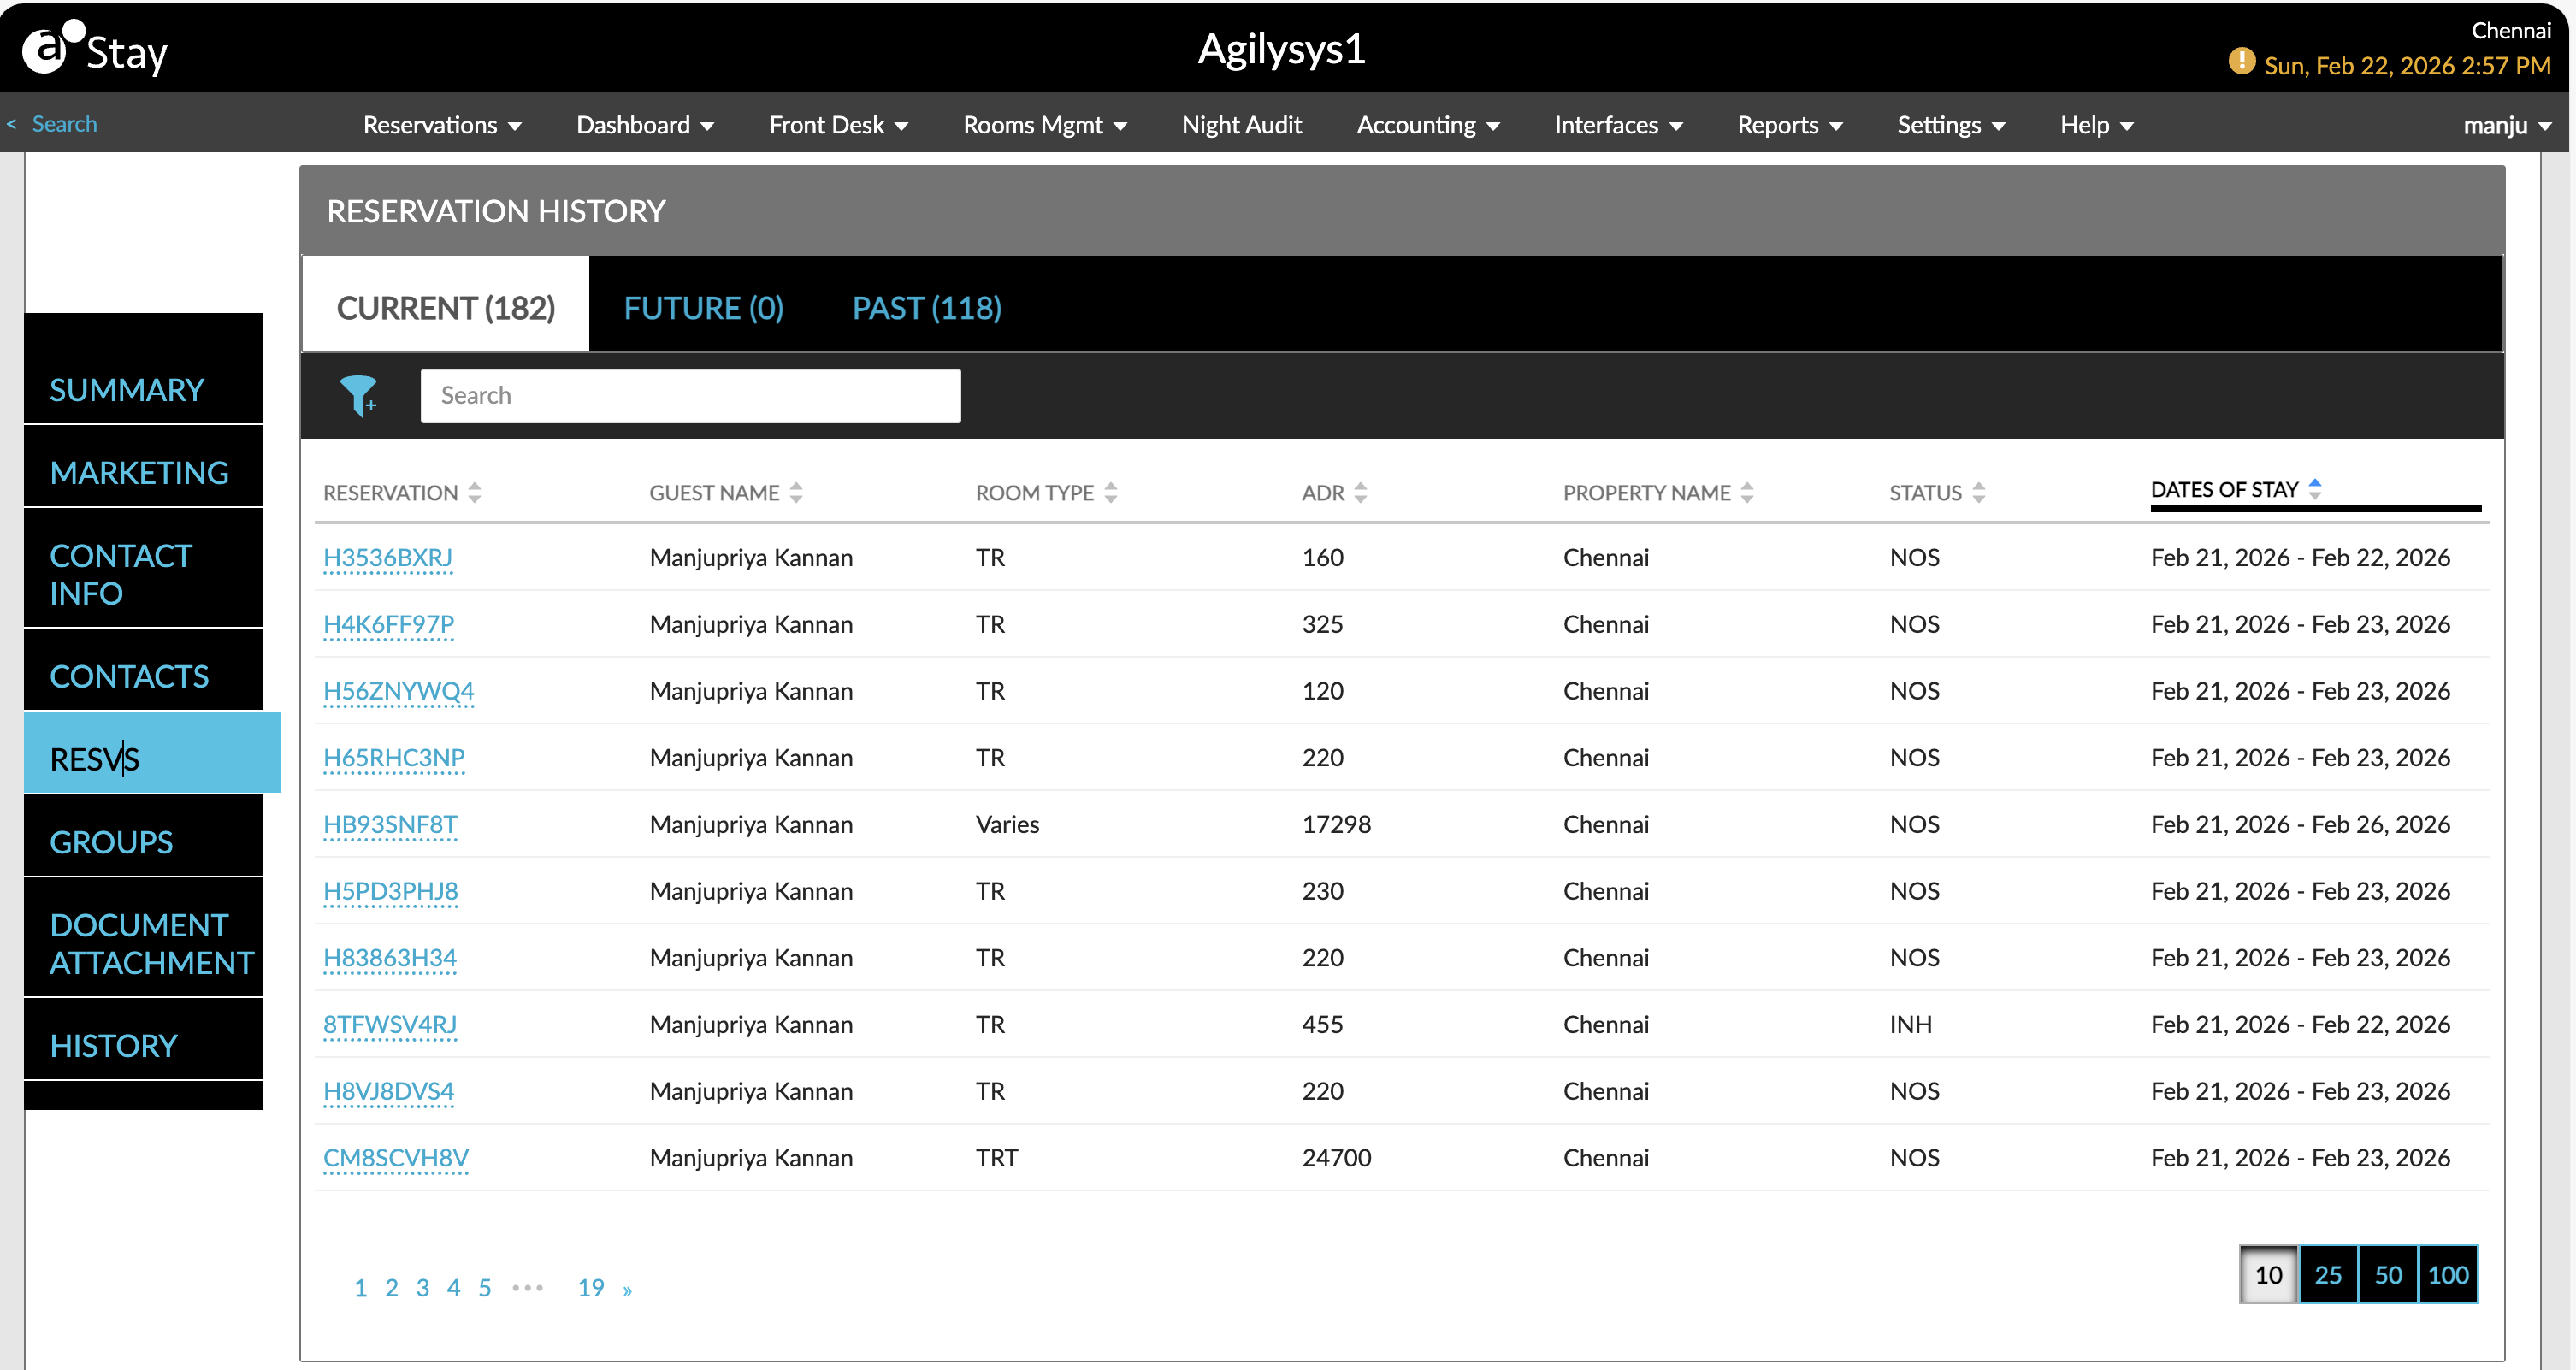
The following columns are displayed in this section:
|
Field |
Description |
|---|---|
|
Reservation |
The confirmation ID of the reservation is displayed as a hyperlink. When clicked, users will be navigated to the respective reservation. |
|
Guest Name |
The guest name associated with the reservation. This column can be sorted. |
|
Room Type |
The room type associated with the reservation. When multiple room types exist under a reservation, Varies, is displayed. This column can be sorted. |
|
ADR |
The average daily rate. This column can be sorted. |
|
Property Name |
The property in which the reservation is created. This column can be sorted. |
|
Status |
The reservation status. This column can be sorted. |
|
Dates of Stay |
The stay dates of the reservation. This column can be sorted. |
Future Section
This section displays the total number of future reservations at the property associated with the company profile. This includes reservations with arrival dates beyond the current property date.
A property-level filter available in this section allows users to select from the multiple properties available. The reservations are retrieved for the selected properties.
A search field has been added that allows users to search reservations using:
-
Confirmation ID
-
Guest profile name
A date filter, Range, allows users to select the date range for retrieving the reservations. Users can select the future dates for which the reservations must be retrieved. Past dates cannot be selected.

Past Section
This section displays the total number of past reservations at the property associated with the company profile. This includes reservations with departure dates before the current property date.
A property-level filter available in this section allows users to select from the multiple properties available. The reservations are retrieved for the selected properties.
A search field has been added that allows users to search reservations using:
-
Confirmation ID
-
Guest profile name
A date filter, Range, allows users to select the date range for retrieving the reservations. Users can select the past dates for which the reservations must be retrieved. Future dates cannot be selected.